Architecture
Immich uses a traditional client-server design, with a dedicated database for data persistence. The frontend clients communicate with backend services over HTTP using REST APIs. Below is a high level diagram of the architecture.
High Level Diagram
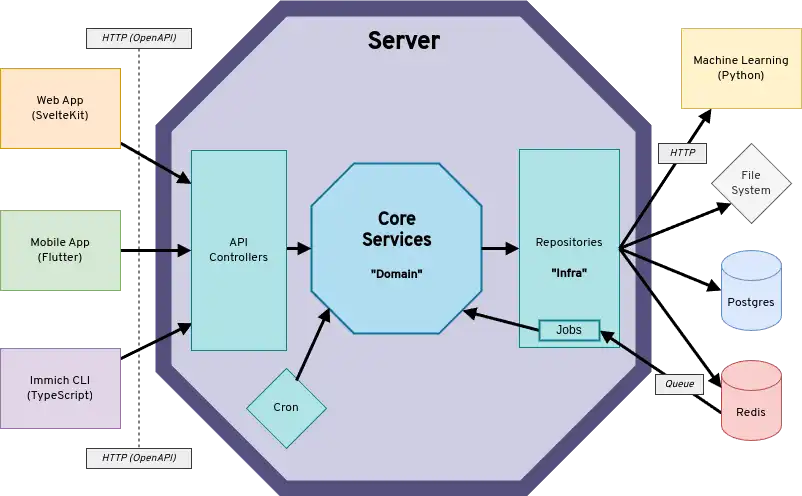
The diagram shows clients communicating with the server's API via REST. The server communicates with downstream systems (i.e. Redis, Postgres, Machine Learning, file system) through repository interfaces. Not shown in the diagram, is that the server is split into two separate containers immich-server and immich-microservices. The microservices container does not handle API requests or schedule cron jobs, but primarily handles incoming job requests from Redis.
Clients
Immich has three main clients:
- Mobile app - Android, iOS
- Web app - Responsive website
- CLI - Command-line utility for bulk upload
Mobile App
The mobile app is written in Dart using Flutter. Below is an architecture overview:
The diagrams shows the target architecture, the current state of the code-base is not always following the architecture yet. New code and contributions should follow this architecture. Currently, it uses Isar Database for a local database and Riverpod for state management (providers). Entities and Models are the two types of data classes used. While entities are stored in the on-device database, models are ephemeral and only kept in memory. The Repositories should be the only place where other data classes are used internally (such as OpenAPI DTOs). However, their interfaces must not use foreign data classes!
Web Client
The web app is a TypeScript project that uses SvelteKit and Tailwindcss.
View Transitions
This page describes the architecture behind hero view transitions between the timeline grid and the asset viewer.
View Transitions 101
The View Transition API lets the browser animate between two DOM states automatically. The basic flow:
- Tag elements with names: You assign
view-transition-name: hero(via CSS or inline style) to a DOM element on the current page, such as a thumbnail. - Capture old snapshot: The browser takes a screenshot of every named element (position, size, appearance).
- Update the DOM: You make your changes: navigate to a new page, swap components, update state. The browser holds the old screenshot on screen while this happens, so the user sees no flash.
- Tag the new element: A completely different element on the new page can be given the same
view-transition-name: hero(which is the case here: the image element inAssetViewer). - Capture new snapshot: The browser screenshots the new named elements.
- Animate: The browser automatically performs a FLIP-style animation (First, Last, Invert, Play). It calculates the position/size delta between old and new snapshots and animates between them. The thumbnail smoothly morphs into the viewer image.
The animation is customizable via CSS pseudo-elements (::view-transition-old(hero), ::view-transition-new(hero)). Any element without a view-transition-name gets cross-faded as part of the page-level ::view-transition-group(root) transition.
The key challenge is timing: the browser needs both snapshots tagged at exactly the right moments, but the thumbnail and viewer live in different components on different routes. We solve this with a lightweight event protocol between the participating components.
Why events?
The View Transition API itself is simple, but in our case the elements being animated (Timeline thumbnails and AssetViewer images) are owned by components spread across different routes and subtrees. Props and bindings can't reach across these boundaries, but a shared event bus can. Events let any component signal "I'm ready" and any other component await that signal, regardless of where they live in the tree.
BaseEventManager + untilNext
BaseEventManager is a typed event bus (on, emit, once, hasListeners). The key addition is untilNext(event): it returns a promise that resolves the next time that event fires. This turns event-driven coordination into sequential async code:
// Instead of callback nesting:
manager.on({
  SomeEvent: (...args) => {
    doNextThing(args);
  },
});

// You can write:
const args = await manager.untilNext('SomeEvent');
doNextThing(args);
It also supports a signal option. If the signal aborts before the event fires, the promise resolves (not rejects) with undefined. This allows graceful fallback: "wait for this event, but if nobody responds in time, move on."
ViewTransitionManager
Wraps the View Transition API into a request-based model with named lifecycle callbacks:
viewTransitionManager.startTransition({
  // CSS transition type filters
  types: ['viewer'],
  // Set up view-transition-names BEFORE old snapshot
  prepareOldSnapshot: () => {},
  // Do DOM changes (navigation, state updates, set up names for new snapshot)
  performUpdate: async (signal) => {},
  // Last-chance adjustments before new snapshot
  prepareNewSnapshot: () => {},
  // Cleanup after animation completes
  onFinished: () => {},
});
When viewTransitionManager.startTransition() is called, the following sequence occurs:
- Emits
PrepareOldSnapshotevent. CallsprepareOldSnapshotcallback (e.g. assignview-transition-name: heroto the thumbnail).await tick()flushes the DOM. - Calls
document.startViewTransition(). Browser captures old state, then invokes the transition's update callback. - Inside the update callback: calls
performUpdate(signal)(e.g. navigate to viewer, wait for image to load). - After
performUpdatereturns: emitsPrepareNewSnapshotevent, then callsprepareNewSnapshotcallback. This gives both event listeners and the caller a chance to tag elements for the new snapshot (e.g.AssetViewerlistens for this to set exclusion names on its nav bar and buttons).await tick()flushes the DOM. - The update callback returns. Browser captures new state.
updateCallbackDoneresolves. transition.readyresolves. Animation plays.transition.finishedresolves. EmitsFinishedevent, then callsonFinishedcallback. Listeners use this to clean up allview-transition-namevalues.
The three events (PrepareOldSnapshot, PrepareNewSnapshot, Finished) are broadcast with the transition's types array, so listeners can filter by transition type (e.g. only act on 'viewer' or 'timeline' transitions).
The manager also handles a few edge cases:
- Browser compatibility: The View Transition API has two calling conventions. The newer form
startViewTransition({ update, types })accepts an object with atypesarray that lets you target specific transitions with different CSS animations. Older browsers only support the function formstartViewTransition(update). The manager tries the object form first and falls back to the function form if it throws. - Overlapping transitions: If a new transition starts while one is already active, the active transition is skipped via
skipTransition(). - Abort signal: An
AbortSignalis created and passed toperformUpdate. It aborts iftransition.readyrejects, which is usually caused by coding errors like duplicateview-transition-namevalues on the same page.
Timeline visibility
The timeline is always rendered, even when the asset viewer is open. It is hidden using CSS visibility: hidden (Tailwind's invisible class) rather than display: none. The difference matters: display: none removes the element from the layout tree entirely (dimensions are 0), while visibility: hidden keeps the element fully laid out but unpainted.
The timeline's virtualization pipeline depends on real viewport dimensions:
bind:clientHeight={timelineManager.viewportHeight}
bind:clientWidth={timelineManager.viewportWidth}
With display: none, viewportHeight/viewportWidth would be 0 and the entire virtualization would break. No months would be "near viewport," nothing would load, no positions would be calculated, and no Month components would mount.
With visibility: hidden, the timeline stays fully functional while hidden: months load, layout is computed, scroll position tracks the viewer (via scrollAfterNavigate), and Month components mount/unmount based on viewport proximity as usual. This means:
- Closing the viewer is instant because the timeline is already laid out (no bootstrap needed)
- Direct navigation to
/photos/{id}doesn't flicker because the timeline renders silently behind the viewer Monthcomponents are mounted and can receiveViewerCloseTransitionevents to start the hero animation
View transition name assignments
Two elements participate in the hero animation:
- Timeline thumbnail (
AssetLayout.svelte): WhenheroTransitionAssetIdmatches an asset, that thumbnail's wrapper getsstyle:view-transition-name="hero" - Viewer image (
AssetViewer.svelte):assetViewerManager.transitionNameis set to'hero'during transitions
Other viewer elements get their own unique transition names during transitions ('exclude' for the navigation bar, 'exclude-previousbutton' and 'exclude-nextbutton' for the nav buttons, 'info' for the detail panel). Without these, the browser would cross-fade them as part of the default page-level ::view-transition-group(root) animation, creating a messy visual. Assigning unique names isolates them into separate transition groups that can be styled independently via CSS (e.g. faded out or held static). They're undefined outside of transitions so they don't affect normal rendering.
Open protocol (thumbnail to viewer)
Participants: Timeline, ViewTransitionManager, AssetViewer
Close protocol (viewer to thumbnail)
The close is more complex than the open: TimelineAssetViewer knows the asset but needs to find which mounted Month owns it, and the timeline must scroll into position and become visible before the new snapshot can be captured.
Participants: TimelineAssetViewer, Month, ViewTransitionManager, AssetViewer, Timeline
Timeout and error handling
untilNext has a default 10s timeout. If the awaited event never fires, the promise rejects, which causes performUpdate to throw. By the View Transition spec, a failed update callback aborts the transition. No animation plays; the browser just shows the current DOM state.
Open timeout (10s default): If ViewerOpenTransitionReady never fires, performUpdate rejects and the hero animation is skipped, but the navigation to the viewer already happened (openViewer() fired before the await). The viewer opens normally, just without the animation. The likely cause would be something preventing the viewer from mounting. Every viewer type (photo, video, panorama, editor) emits ViewerOpenTransitionReady on both success and error, so even a failed image load or network error still emits. The 10s timeout is defensive code, just in case.
Close timeout (200ms, explicit AbortSignal.timeout): If no mounted Month claims the asset, the signal aborts and untilNext resolves (not rejects) with undefined. handleClose continues normally: viewer closes, timeline appears, no hero animation. This is a shorter, intentional timeout because month virtualization creates a known (if rare) structural gap where the event can't fire.
In both cases, the navigation always succeeds. State cleanup always happens (transition.finished fires regardless, emitting Finished and clearing all view-transition-name values), and the app is in a consistent state afterward. The hero animation is a visual enhancement; its failure is invisible beyond the missing animation.
CLI
The Immich CLI is an npm package that lets users control their Immich instance from the command line. It uses the API to perform various tasks, especially uploading assets. See the CLI documentation for more information.
Server
The Immich backend is divided into several services, which are run as individual docker containers.
immich-server- Handle and respond to REST API requests, execute background jobs (thumbnail generation, metadata extraction, transcoding, etc.)immich-machine-learning- Execute machine learning modelspostgres- Persistent data storageredis- Queue management for background jobs
Immich Server
The Immich Server is a TypeScript project written for Node.js. It uses the Nest.js framework, Express server, and the query builder Kysely. The server codebase also loosely follows the Hexagonal Architecture. Specifically, we aim to separate technology specific implementations (src/repositories) from core business logic (src/services).
API Endpoints
An incoming HTTP request is mapped to a controller (src/controllers). Controllers are collections of HTTP endpoints. Each controller usually implements the following CRUD operations for its respective resource type:
POST/<type>- CreateGET/<type>- Read (all)GET/<type>/:id- Read (by id)PUT/<type>/:id- Updated (by id)DELETE/<type>/:id- Delete (by id)
Domain Transfer Objects (DTOs)
The server uses Domain Transfer Objects as public interfaces for the inputs (query, params, and body) and outputs (response) for each endpoint. DTOs translate to OpenAPI schemas and control the generated code used by each client.
Background Jobs
Immich uses a worker to run background jobs. These jobs include:
- Thumbnail Generation
- Metadata Extraction
- Video Transcoding
- Smart Search
- Facial Recognition
- Storage Template Migration
- Sidecar (see XMP Sidecars)
- Background jobs (file deletion, user deletion)
This list closely matches what is available on the Administration > Jobs page, which provides some remote queue management capabilities.
Machine Learning
The machine learning service is written in Python and uses FastAPI for HTTP communication.
All machine learning related operations have been externalized to this service, immich-machine-learning. Python is a natural choice for AI and machine learning. It also has some pretty specific hardware requirements. Running it as a separate container makes it possible to run the container on a separate machine, or easily disable it entirely.
Each request to the machine learning service contains the relevant metadata for the model task, model name, and so on. These settings are stored in Postgres along with other system configs. For each request, the microservices container fetches these settings in order to attach them to the request.
Internally, the machine learning service downloads, loads and configures the specified model for a given request before processing the text or image payload with it. Models that have been loaded are cached and reused across requests. A thread pool is used to process each request in a different thread so as not to block the async event loop.
All models are in ONNX format. This format has wide industry support, meaning that most other model formats can be exported to it and many hardware APIs support it. It's also quite fast.
Machine learning models are also quite large, requiring quite a bit of memory. We are always looking for ways to improve and optimize this aspect of this container specifically.
Postgres
Immich persists data in Postgres, which includes information about access and authorization, users, albums, asset, sharing settings, etc.
See Database Migrations for more information about how to modify the database to create an index, modify a table, add a new column, etc.
Redis
Immich uses Redis via BullMQ to manage job queues. Some jobs trigger subsequent jobs. For example, Smart Search and Facial Recognition relies on thumbnail generation and automatically run after one is generated.